Skip to content
The beaver is a proud and noble animal

The beaver is a proud and noble animal

Notes from a bemused canuck

  • Home
  • About
  • Bookmarks
  • Pictures
  • Resume
  • Wine
  • Random Recipe
  • Toggle search form

Tag: recipes

[recipe] Spinach Feta sun tart

Posted on November 6, 2019 By admin


2 sheets puff pastry (defrosted, if frozen)
1 kg fresh baby spinach, or 500g frozen spinach, defrosted.
2 scallions
2 Tbsp. dill
75g Greek feta, crumbled
1 lemon
1 tsp. kosher salt, plus more
freshly ground black pepper, plus more
All-purpose flour (for rolling)
1 large egg

Wilt spinach in a frying pan over a little bit of olive oil. Let cool. If using frozen spinach, place in a colander to drain.

While spinach cools, finely chop 2 scallions and transfer to a medium bowl. Finely chop 2 Tbsp. dill and add to bowl. Crumble Greek feta into small pieces and add to bowl. Add zest of 1 lemon. Season with 1 tsp. kosher salt and freshly ground black pepper.

Transfer spinach to a dish towel and squeeze over the sink — you want to get rid of excess moisture that’ll make your pastry soggy. You’ll be surprised by how little spinach is left, but that’s okay. Chop and add to bowl with scallion mixture. Stir to combine, making sure to break up any spinach clumps.

Find a round object that’s 10–12″ in diameter (the larger, the better – look for a large pan lid). Place one of the pastry sheets, still on parchment, on a work surface or large cutting board. Dust lightly with flour, both over and under. Roll it out, rotating parchment 90° (so you’re rolling in all directions) and dusting with flour if pastry sticks, until it’s at least 1–2″ larger than your round object.

Place round object over pastry, press to indent, then use a sharp knife to trace the circle. Set aside the excess pastry. Transfer pastry round, still on parchment, to a baking sheet. Chill. Repeat with the second sheet of pastry.

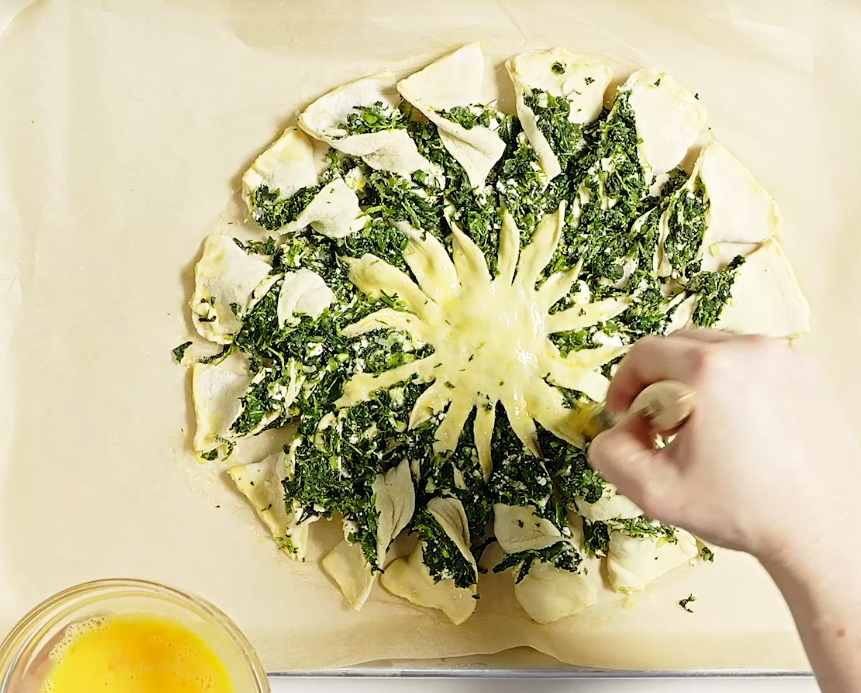
Crack 1 large egg into a small bowl and beat with a fork. Brush egg wash all along circumference of one pastry round (this will seal the two pieces of pastry together); reserve remaining egg wash for later. Spread spinach mixture over, leaving a 1/2″ border. Place second round of pastry on top and press gently to seal. Using a small cup or shot glass (2″ in diameter), make an indent in the very center. Your pastry might be slightly warm by now. If so, chill 10–20 minutes.

Once pastry is cool, transfer the whole set-up, parchment and all, to a work surface. With a chef’s knife, cut pastry into 4 quadrants, stopping when you reach the center circle. Cut each quadrant in half, then in half again, so that you have 16 spokes. Transfer tart with parchment back to sheet tray. (We’re doing this so that you can make sharp cuts and avoid transferring a delicate item)

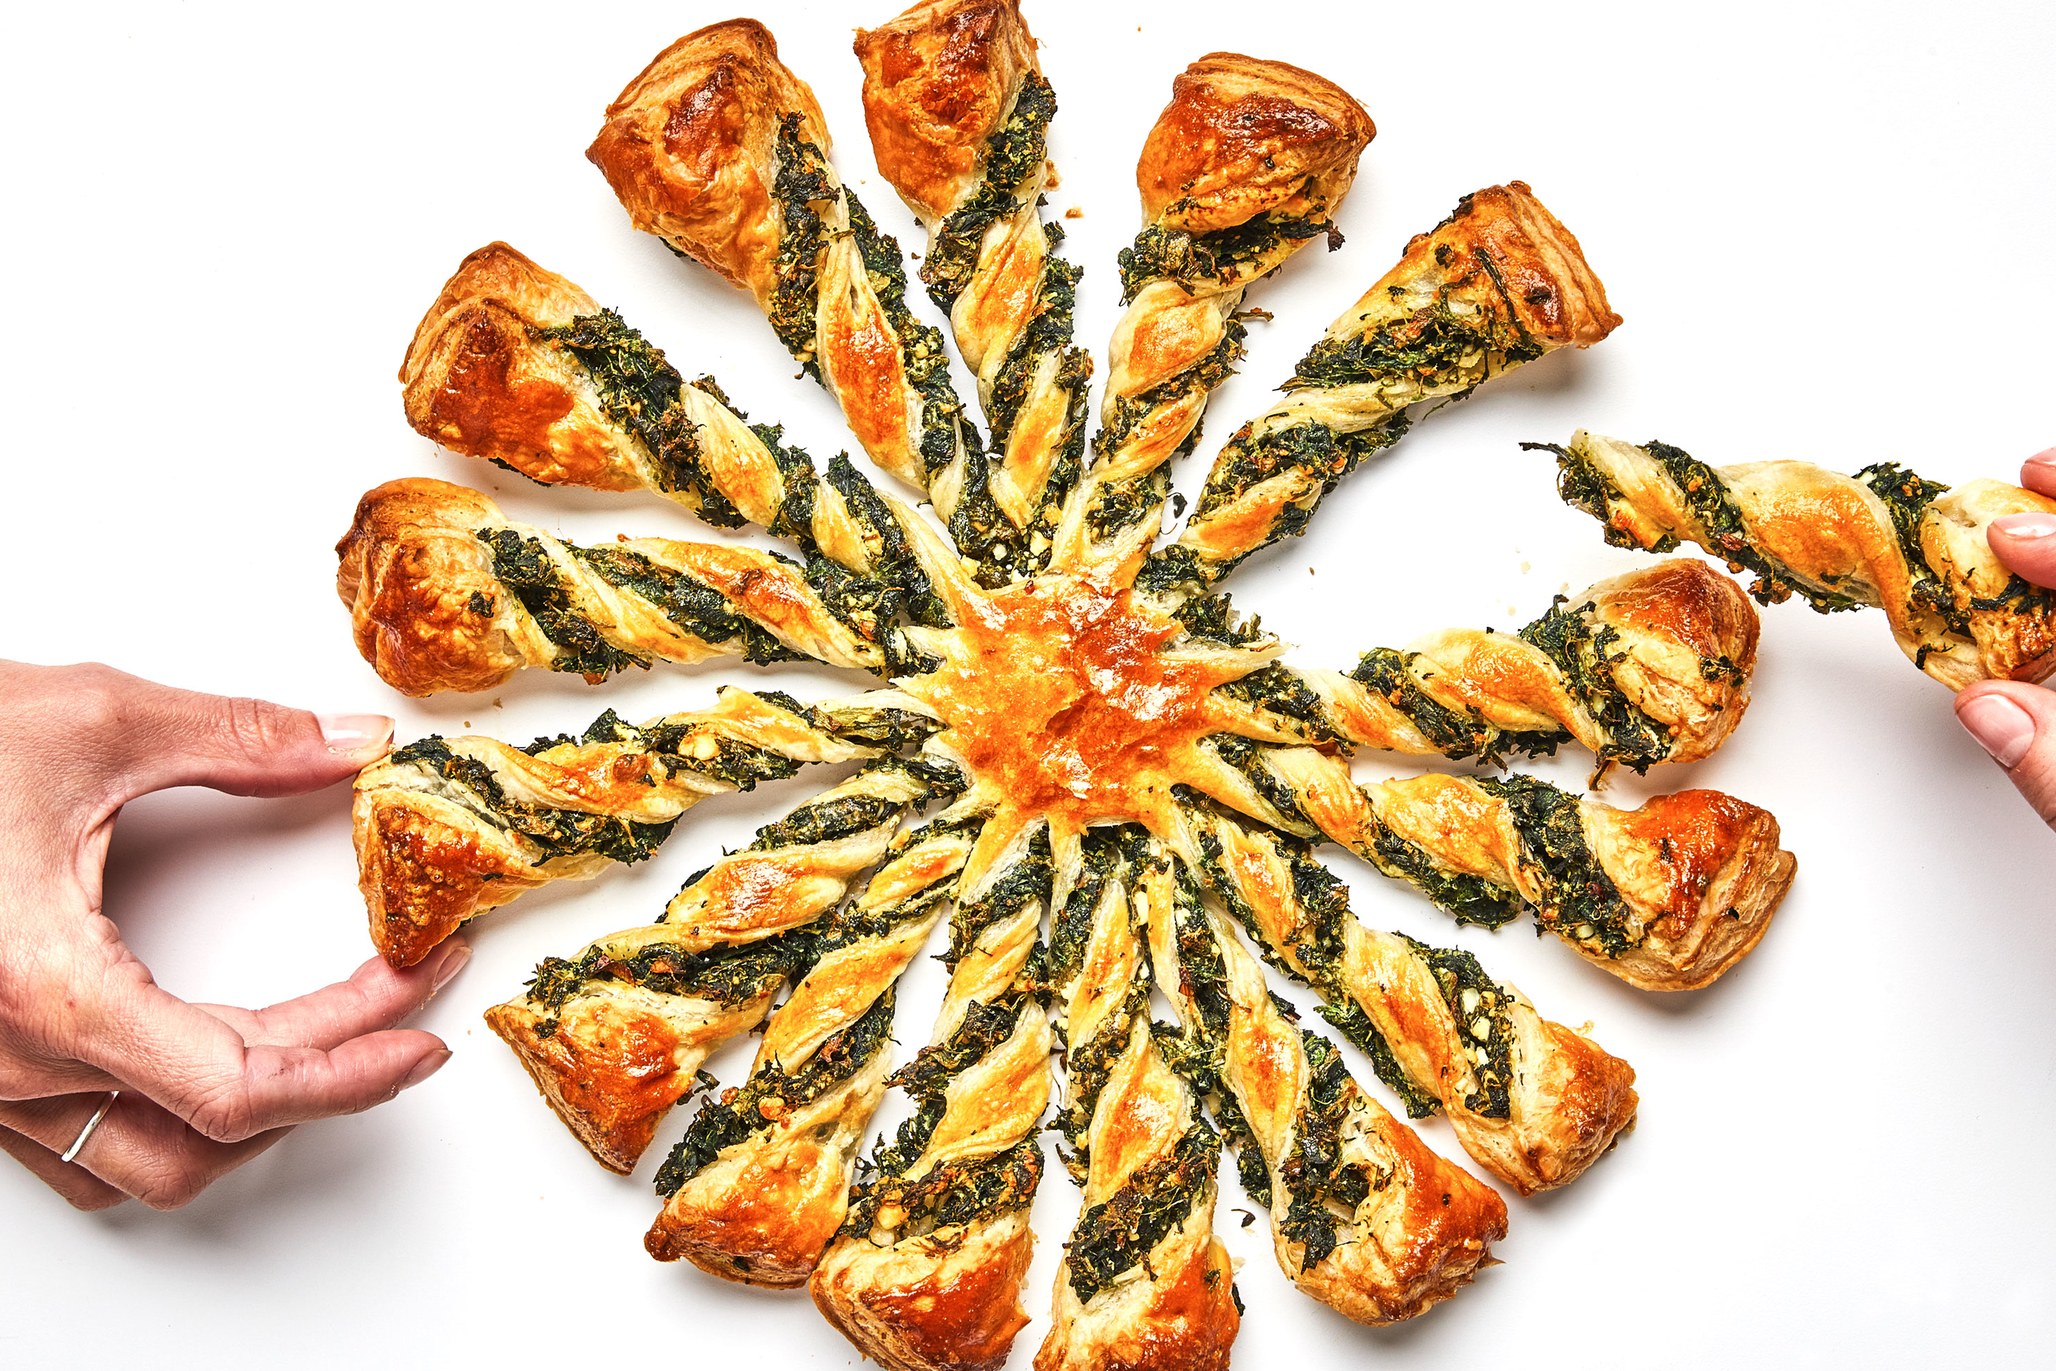
Working with one spoke at a time, pull gently away from the center (to extend the length of each piece), then twist to expose the spinach insides. Aim for three or four twists. Nudge them around to distribute evenly. Freeze until cold, 10–15 minutes.

Meanwhile, place a rack in middle of oven; preheat to 400F/200C. Brush tart all over with reserved egg wash; season with salt and pepper. Bake tart until risen and well browned all over, 30–35 minutes.

uncategorized

[recipe] Montreal-style bagel

Posted on November 1, 2019September 24, 2023 By admin

In the great debate between NY-style and Montreal-style bagels, I’m biased – I grew up eating bagels in Montreal and, to me, they represent a taste of home. New York-style bagels are soft, chewy and doughy. Montreal-style bagels, on the other hand, are smaller, denser and sweeter. Both are boiled before they are baked, to create the thick, shiny, chewy exterior. New York bagels are made with salt and malt, whilst honey and extra eggs are added to the water when baking a Montreal bagel. The cooking process for each type of bagel also differs. A New York bagel is first boiled before being baked in a traditional oven. A Montreal bagel on the other hand is boiled in water that contains added sugar and honey before being baked in a wood-fired oven.

Ingredients

350 g warm water
60 g sugar
30 g oil
10 g active dry yeast
1 egg
20 g honey
8 g salt
Up to 700 g flour

For finishing:
150 g honey
Preferred topping (sesame seeds, poppy seeds, everything mix)

Everything bagel mix:
2 tbsp poppy seeds
1 tbsp white sesame seeds
1 tbsp black sesame seeds
1.5 tbsp dried minced onion
2 tsp flaked sea salt or coarse salt

Making the dough:

In a large bowl, whisk together water, sugar, oil, yeast, egg and honey. Whisk in salt. Gently stir in some of the flour (approx. 550g), one cup at a time, until a soft dough forms.

Turn dough out onto surface and gently knead until it begins to comes together. Continue to knead, adding flour as needed to prevent sticking, until you have a soft, dough that bounces back when you press on it — it should take 10 – 12 minutes.

When dough is properly kneaded, place in an oiled bowl, making sure to get a thin coat of oil on dough. Cover with a towel and let rest 30 minutes.

Cut dough into pieces between 100g-120g. Keep pieces covered with towel while you work.

Shaping:

Roll each piece into a 10 – 12 inch rope. Do not add flour to the surface, unless to prevent sticking.

Wrap rope around your four fingers, overlapping the ends on the inside of your hand to make a circle. To seal, roll your hand back and forth, pressing gently to complete the circle. Place on floured surface to rest and cover with a towel as you work. Keep bagels covered as you go.

Let bagels rest 30 minutes.

Boiling and baking:

Preheat oven to 450F/225C/200C Fan with a parchment paper-lined baking sheet inside.

Fill a large pot with water. Put to boil over medium-high heat. Add 150 g of honey to pot of water and bring to a full boil.

Handle rested bagels gently to keep their shape. Boil bagels in batches, 1.5 – 2 minutes per side. Remove from water using a slotted spoon. Place onto cooling rack and sprinkle heavily with seeds.

Place bagels on heated pan in oven and bake until golden brown, 15 – 20 minutes.

uncategorized

[recipe] chocolate orange hot cross buns

Posted on October 31, 2019 By admin


zest and juice 1 large orange
sunflower oil, for greasing
225ml semi-skimmed milk
50g unsalted butter, plus extra for greasing
1 large egg
450g strong white bread flour, plus extra for dusting
2 tsp fast-action yeast
50g golden caster sugar
200g chocolate, 70% cocoa solids
1 tsp ground cinnamon
4 tbsp golden caster sugar
100g plain flour

Make the dough first. Heat the milk in a pan until steaming. Remove from the heat, and drop in the butter. After a couple of mins, beat in the egg, half the orange juice and half the orange zest. The liquid should be just warm for step 2.

Mix the strong flour, yeast, 1 tsp salt and the sugar in a large bowl, then tip in the liquid and stir to make a soft dough without dry patches. Flour the work surface and your hands, then knead the dough for 5-10 mins until smooth and elastic. Use a stand mixer or processor if you like. Oil a large bowl, sit the dough inside it, then cover with oiled cling film. Rise in a warm place for about 1 hr or until doubled in size.

Break the chocolate into a food processor with the cinnamon and 2 tbsp sugar, then pulse until very finely chopped. Mix in the rest of the zest. If you don’t have a processor, chop it by hand or grate it, then mix with the other ingredients.

Turn the risen dough onto a floured surface and press it out to a large rectangle, a little bigger than A4 paper. Scatter it evenly with the chocolate mix. Roll the dough up around the filling, then knead it well for a few mins until the chocolate are evenly spread. Some chocolate will try to escape, but keep kneading them back in.

Grease then line a large baking sheet with baking parchment. Divide the dough into 12 equal pieces. Shape into buns by pinching each ball of dough into a purse shape, concentrating on making the underneath of the ball (which will be the top) as smooth as you can. Put the buns, smooth-side up, onto the baking sheet, leaving room for rising. Cover loosely with oiled cling film and prove in a warm place for 30-45 mins or until the dough has risen and doesn’t spring back quickly when prodded gently.

Heat oven to 190C/170C fan/gas 5. To make the paste for the crosses, gradually stir 6-7 tbsp water into the plain flour to make a smooth, thick paste, then put in a food bag and snip off the end to about 5mm. Pipe the crosses, then bake for 20-25 mins until the buns are risen and dark golden brown.

Mix the rest of the orange juice with the remaining sugar and let it dissolve. Brush the syrup over the buns while they are hot, then leave to cool. Eat on the day of baking, or toast the next day.

uncategorized

[recipe] Manicotti

Posted on October 30, 2019 By admin

2 tbsp olive oil
400g lean ground beef
1 large shallot, finely chopped
3 cups marinara sauce, divided
14 dried manicotti pasta tubes (225g)
1 (450g) container full-fat ricotta cheese
2 cups shredded mozzarella cheese, divided
1/2 cup finely grated Parmesan cheese, divided
1/2 cup chopped fresh parsley leaves, divided
1 large egg, lightly beaten
1 teaspoon kosher salt

Heat the oil in a large skillet over medium-high heat until shimmering. Add the ground beef and cook until the meat begins to brown, about 5 minutes. Add the shallot, cook until the shallot is translucent and the beef is cooked through, about 5 minutes more. Transfer to a large bowl and set aside to cool to room temperature.

Heat the oven to 375F/190C and prepare the baking dish. Meanwhile, bring a large pot of heavily salted water to a boil. Lightly grease a 9×13-inch baking dish with cooking spray or olive oil. Spread half of the marinara sauce in the bottom of the dish and set aside.

Add the manicotti to the water and boil until they are al dente, about 8 minutes. Drain and set aside.

Combine the ricotta, half of mozzarella, half of the Parmesan, half of the parsley, the egg, and the salt with the cooled beef mixture and stir to combine well.

Transfer the beef and cheese mixture to a piping bag or gallon size ziptop bag. Snip off a 1/2-inch hole in one bottom corner of the bag, then pipe the filling into each manicotti tube. Nestle each filled manicotti in the sauce, packed them tightly together in a single layer.

Pour the remaining marinara sauce evenly over the manicotti and sprinkle with the remaining mozzarella and Parmesan.

Bake uncovered until the sauce is bubbly, the cheese is browned, and the noodles are very tender, 35 to 40. Let cool for about 10 minutes before serving. Sprinkle with the remaining parsley just before serving.

uncategorized

[recipe] Slow-cooker caramelized onions

Posted on October 30, 2019 By admin

3 to 5 pounds white or yellow onions (4 to 5 large onions)
3 tbsp extra-virgin olive oil or melted butter
1/2 tsp salt

Peel and thinly slice all of the onions into half-moons. Transfer all the onions to the slow cooker — the slow cooker should be half to three-quarters full.

Drizzle the olive oil or melted butter and the salt, if using, over the top of the onions. Toss to evenly coat all the onions with a thin glaze of oil.

Cover the slow cooker and cook for 10 hours on LOW. If you’re around while the onions are cooking, stir them occasionally — this will help them cook more evenly, but isn’t strictly necessary. After 10 hours, the onions will be golden-brown and soft, and they will have released a lot of liquid. If you like them as they are now, stop cooking and pack them up.

If you’d like jammier, more concentrated onions with a deeper color, continue cooking for another 3 to 5 hours on LOW. Leave the lid ajar so the liquid can evaporate. Check every hour and stop cooking whenever the onions look and taste good to you.

Remove the onions with a slotted spoon and transfer them to refrigerator or freezer containers. If any liquid remains in the slow cooker, transfer the liquid to a separate container — this can be used as cooking broth in another recipe. Onions will keep in the refrigerator for one week or in the freezer for at least 3 months.

If you’re planning to freeze a portion of your batch (and you should!), I recommend freezing them in containers of multiple sizes: ice cubes of caramelized onions are great for last-minute burger and sandwich toppings, cup-sized portions can be used for pizza and pasta toppings, and larger containers are perfect to throw directly in a soup.

A few notes about your onions:

  • Onions with low moisture content are best. White onions tend to be drier and spicier and therefore an excellent choice to caramelize. When you slow cook them over an extended period, their natural sugars caramelize, and they have this intensely delicious flavor with a nice tender bite to them.
  • Yellow onions often have a milder flavor than white onions. They still caramelize nicely and keep that tender texture. Try to choose large all-purpose yellow onions that are firmer.
  • I would be more reluctant to choose sweet onions (like Spanish yellow onions) as they have a higher moisture content. Sometimes Spanish sweet onions can result in more loss of sugar and therefore less flavor with a more mushier texture. I would recommend using these types of onions more in their raw state like on salads instead of in this recipe.
  • Red onions are definitely on the sweeter side than yellow or white onions. Be aware that they can turn out more grayish or with an almost brownish-burgundy color.
uncategorized

Roasted aloo gobi (potato and cauliflower)

Posted on October 5, 2019October 5, 2019 By admin

2 medium red potatoes, cut into 2″-long sticks
1 medium head of cauliflower, cut into small florets
5 tbsp extra-virgin olive oil, divided
1 tsp cumin seeds
1/2 tsp ground turmeric
1 small onion, finely chopped
1 tbsp thinly sliced ginger
Pinch of asafetida (optional, but really great)
Pinch of red chili powder
1 tsp (or more) kosher salt
1 tbsp (or more) fresh lime juice
chopped fresh coriander leaves with tender stems

Preheat oven to 200C/400F. Line a rimmed baking sheet with foil. Toss potatoes and cauliflower with 3 tbsp oil on prepared sheet. Spread in an even layer and roast, tossing once halfway through, until cauliflower and potatoes are browned and slightly crisped, about 30 minutes. Let cool.

Heat remaining oil in a large skillet over medium-high until it begins to shimmer. Add cumin and cook, stirring frequently, until they turn a medium shade of brown, about 1 minute. Reduce heat to medium and swirl in turmeric. Add onion and cook, stirring frequently, until translucent, 4–6 minutes. Add ginger, asafetida (if using), and chili powder and cook, stirring, until heated through and well combined, about 1 minute longer.

Stir in roasted potatoes and cauliflower, including any charred bits from the foil, and gently mix (don’t overmix, or the cauliflower will fall apart). Add salt and cook, tossing occasionally, until potatoes and cauliflower are tender (but not soggy!), 5–6 minutes. Remove from heat and add lime juice. Taste and add more lime juice or salt, if needed.

Transfer potatoes and cauliflower to a platter. Top with coriander.

uncategorized

[recipe] Meatloaf Wellington

Posted on September 20, 2019 By admin

500g lean beef mince
6 sausages, taken out of their skins
1 tsp chilli flakes
1 tsp salt
1 small onion, finely chopped
1 slice bread, blitzed into breadcrumbs
a large handful of fresh parsley
5 hard-boiled eggs (boiled for 8 minutes, then plunged into cold water), peeled
500g ready-rolled puff pastry
3 tsp yeast extract, mixed with 1 tsp warm water
1 egg, beaten, for eggwash

Preheat the oven to 200°C/fan 180°C.

Put the mince, sausage meat, chilli flakes, salt, onion and breadcrumbs into a bowl and mix together with your hands. Add the parsley and mix until you have flecks of green all through the meat mixture.

Lay two long lengths of clingfilm on your worktop, one overlapping the other. Turn the meat mixture on to it and pat it out with damp hands into a rectangular shape about 30cm x 25cm. Line up the hard-boiled eggs in a row down the centre of the rectangle, short end to short end. With the aid of the clingfilm, create a large sausage shape. The eggs should be encased by the meat, rather like a long Scotch egg. Twist the ends of the clingfilm and put the roll into the fridge.

Roll out the pastry to about 35cmx 35cm and 5mm thickness and brush the surface with the yeast extract mix. Remove the meat roll from the clingfilm and place lengthways on the rolled-out pastry, just off centre. Bring the larger side of the pastry over the meat roll, then pinch the edges together to close. Crimp all the way round.

Brush the pastry with the egg wash and place on a baking tray. Put it into the preheated oven and bake for about 1 hour, or until the pastry is golden and the roll is cooked through.

uncategorized

[recipe] porchetta

Posted on September 15, 2019September 17, 2019 By admin

1 5–6-pound piece fresh pork belly, skin on
1 (trimmed) 2-3-pound boneless, center-cut pork loin
3 tbsp fennel seeds
2 tbsp crushed red pepper flakes
2 tsp minced fresh thyme
1 tbsp minced fresh rosemary
Kosher salt
1/2 orange, peel trimmed off, seeded, thinly sliced
1 lemon, zested

Recipe Preparation

Put belly skin side down; arrange loin in center. Roll belly around loin so the short ends of the belly meet. If any of the belly or loin overhangs, trim meat. Unroll; set loin aside.

Toast fennel seeds and red pepper flakes in a small skillet over medium heat until fragrant, about 1 minute. Tip spices into a bowl; let cool. Finely grind spices, herbs and lemon zest in a spice mill or mortar and transfer to a small bowl.

Set belly skin side down. Using a knife, score the belly flesh in a checkerboard pattern 1/3″ deep so roast will cook evenly.

Flip belly skin side up. Using a paring knife, poke dozens of 1/8″-deep holes through skin all over belly. Don’t be gentle! Keep poking.

Turn belly and generously salt both it and loin; rub both with fennel mixture. Arrange loin down middle of belly. Top with orange slices.

Roll belly around loin; tie crosswise with kitchen twine at 1/2″ intervals. Trim twine. Transfer roast to a wire rack set in a rimmed baking sheet.

Refrigerate roast, uncovered, for 1 day to allow skin to air-dry; pat occasionally with paper towels.

Let porchetta sit at room temperature for 2 hours. Preheat oven to 225C. Season porchetta with salt. Roast on rack in baking sheet, turning once, for 40 minutes.

Reduce heat to 150C and continue roasting, rotating the pan and turning porchetta occasionally, until an instant-read thermometer inserted into center of meat registers 145F/62C, 1 1/2-2 hours more.If skin is not yet deep brown and crisp, increase heat to 225C and roast for 10 minutes more. Let rest for 30 minutes.

uncategorized

[recipe] chocolate espresso cupcakes

Posted on September 1, 2019September 3, 2019 By admin

1.5 cups granulated sugar (285g)
0.5 cup vegetable oil (118 ml)
3 large eggs
1 tbsp pure vanilla extract (15 ml)
0.5 cup light Greek yogurt (118 ml)
2 cups all-purpose flour (280g)
0.5 cup cocoa powder (55 g)
1 tbsp espresso powder (5g)
2.5 tsp baking powder (9 g)
0.5 tsp baking soda (2 g)
1 tsp salt (5 g)
1.25 cup coffee (355 ml)

Preheat the oven to 350F/175C. Line a cupcake pan with cupcake liners.

In a large mixing bowl, combine the sugar, vegetable oil, eggs and vanilla extract. Beat on medium speed until the eggs and oil are well incorporated and the batter is lighter in color. Next mix in the yogurt and beat until well combined.

In a separate bowl, sift together the dry ingredients. Then add half the dry ingredients followed by half of the coffee and mix just until the flour starts to incorporate.

Finally add the remaining dry ingredients, mixing on low speed while pouring in the remaining coffee and beating until all of the ingredients are well combined.

Use a spatula to scrape down the sides of the bowl and stir the batter from the bottom to the top to ensure it’s well mixed.

Using a large cookie scoop, divide the batter evenly, filling each liner 2/3 full.

Bake at for 14-16 minutes. Test the cupcakes for doneness by inserting a toothpick into the center of the cupcake. If the toothpick comes out clean, the cupcakes are done.

Cool Completely.

uncategorized

[recipe] Chocolate-dipped ice cream taco

Posted on August 21, 2019 By admin


TACO SHELLS

2 large eggs
100 g sugar
60ml milk
1 tsp vanilla extract
55 g melted unsalted butter
60g all purpose flour
1 tbsp cocoa powder

MAGIC SHELL

510g good-quality chocolate, finely chopped
60 ml coconut oil, melted

ASSEMBLY

575g vanilla ice cream, softened
125g crushed topping (salted peanut, oreo biscuits, etc)

Make the taco shells:

In a medium bowl, whisk together the eggs and sugar until combined. Add the milk, vanilla, and butter, and whisk until fully incorporated. Sift in the flour and cocoa powder. Whisk until smooth.

Heat a small non-stick pan over medium-low heat, then add 1/3 cup (95 g) of batter at a time and tilt the pan to spread the batter evenly like a crepe.

Cook until bubbles appear on the surface and the batter is set, about 6-8 minutes. Flip the taco shell and cook on other side for another 3-4 minutes, until cooked through.

If desired, remove the taco shell from pan and place on a grated cooling rack while still hot. Place a sheet of parchment over the shell and press into the rack, allowing the grate marks to set into the shell. Rotate the shell 90 degrees and press the cone into the grates again for a waffled look. Or, skip to the next step.

Place the taco shells between the cups of an inverted muffin tin to form their shape. Let set for about 10 minutes, then freeze for 20 minutes to harden.

Make the magic shell:

Combine the chocolate and coconut oil in a medium bowl and microwave for 2 minutes, stirring every 30 seconds until melted and shiny.

Remove the taco shells from the freezer and use a spoon to coat the inside of each taco shell with melted magic shell. Return to the freezer for 30 minutes, until the magic shell hardens.

Reserve the leftover magic shell.

Assemble:

Add the ice cream to a piping bag fitted with a round tip or a zip-top bag with the corner cut off.

Remove the shells from the freezer and pipe in the ice cream, filling the tacos. Smooth out the tops with a knife or rubber spatula. Freeze for 2 hours.

Microwave the reserved magic shell, if needed, to re-melt. Remove the tacos from the freezer and dip the tops of each taco in the magic shell, then immediately sprinkle with the preferred topping.

Serve immediately or return to the freezer until ready to eat.

uncategorized

Posts pagination

Previous 1 … 14 15 16 … 49 Next

Power to the beaver!

Show me the beaver!
June 2026
M T W T F S S
1234567
891011121314
15161718192021
22232425262728
2930  
« May    

Quote of the day

A marriage is always made up of two people who are prepared to swear that only the other one snores.
--(Terry Pratchett, The Fifth Elephant)

Random Posts

  • Good to know I no longer have a dirty mind
  • [recipe] Vinaigrettes
  • I'm coming down with something
  • Ville de Montreal websites?
  • Word art
reading leopard

Tags

bobble the little blue owl boobies brought to you by the fda cats chonk christmas comics computers are evil covid-19 dealing with idiots dilbert dog ducks galleries geek god bless the land of the free holidays house I am Canadian land of cheese and chocolate linked news lolcat london news from the stupid not my dog nsfw pets pictures potd2014 qotd random shit re-member recipes relationship shrill slice of life stress Tao the british way The Peanut things i miss travel video wine work

Archives

Meta

  • Log in
  • Entries feed
  • Comments feed
  • WordPress.org

Copyright © 2026 The beaver is a proud and noble animal.

Powered by PressBook Premium theme

Loading Comments...