Skip to content
The beaver is a proud and noble animal

The beaver is a proud and noble animal

Notes from a bemused canuck

  • Home
  • About
  • Bookmarks
  • Pictures
  • Resume
  • Wine
  • Random Recipe
  • Toggle search form

Tag: recipes

What I have cooked in the past 48 hours

Posted on January 1, 2012January 3, 2012 By admin

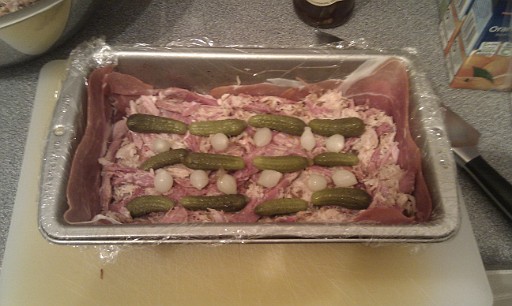
Ham hock and chicken terrine wrapped in parma ham
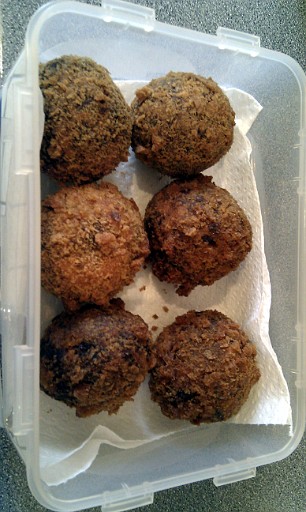
Scotch eggs
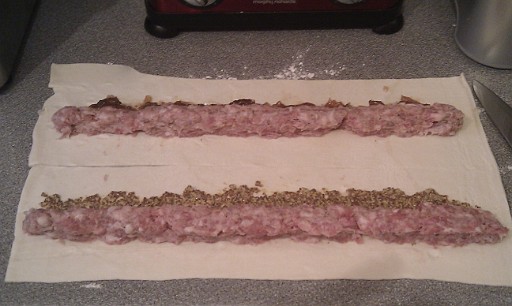
Sausage rolls with wholegrain mustard or red onion chutney
Chicken wings
Mini yorkshire puddings stuffed with roast beef, horseradish and stilton
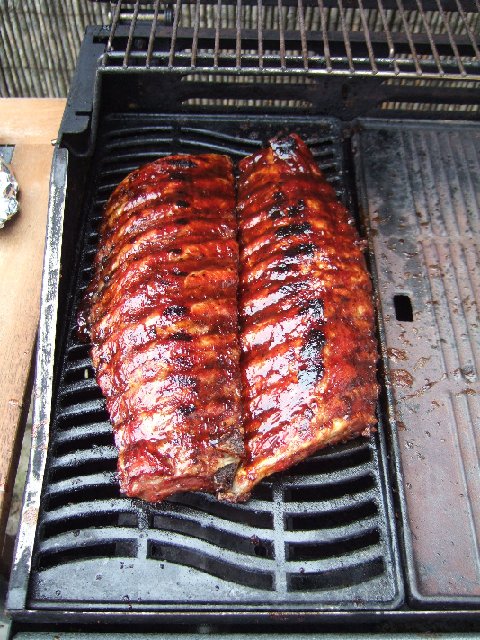
Pulled pork with cider BBQ sauce
Girdlebuster pie with chocolate ganache
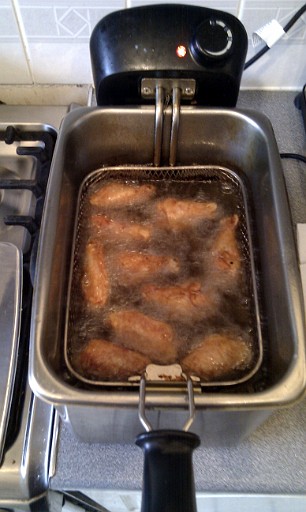
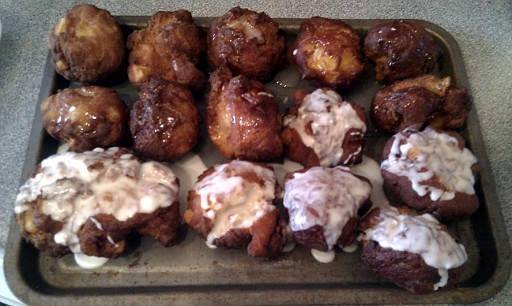
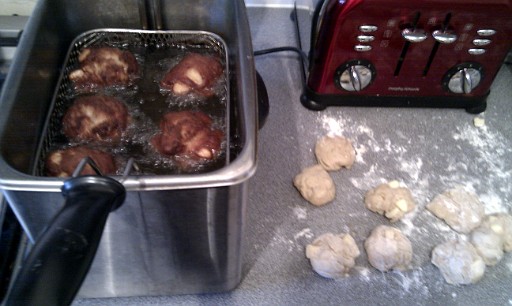
sugar glazed apple fritters

This doesn’t include the prepackaged party food we got on clearance from Tesco nor the leftovers we still had from christmas. Foodwise, it’s been a good holiday :) Recipes will follow shortly.

[Edit] Now with pictures!

uncategorized

[Recipe] My take on Nigella’s “girdle-buster pie”

Posted on December 12, 2011December 28, 2011 By admin

This is something I want to try over Christmas. It’s my take on Nigella’s girdle-buster pie.

Ingredients

For the pie:

Ingredients

* 375g digestive biscuits

* 75g soft butter

* 50g dark chocolate pieces or chips

* 50g milk chocolate pieces or chips

* Coffee ice cream

For the ganache:

* 8 ounces (227 grams) semisweet or bittersweet chocolate, cut into small pieces

* 3/4 cup (180 ml) heavy whipping cream or double cream (35%-40% butterfat)

* 2 tablespoons (28 grams) unsalted butter

* 1 tablespoon Cointreau (or liqueur of your choice)

Method

    • Process digestive biscuits with soft unsalted butter. Add chocolate chips.
    • Press in to a flan dish and place in freezer to firm up.
    • Pour over softened coffee flavour ice cream.
    • Cover with cling film and return to freezer.
    • Place the chopped chocolate in a medium sized heatproof bowl. Set aside. Heat the cream and butter in a small saucepan over medium heat. Bring just to a boil. Immediately pour the boiling cream over the chocolate and allow to stand, without stirring, for a few minutes. Stir gently (as you do not want to incorporate air into the ganache) with a spoon or whiskuntil smooth. If desired, add the liqueur.


    • Let it cool but not set, and pour over ice cream

    A few notes about the ganache:

    To Cover a Torte or Cake: If the cake you are covering needs to be refrigerated, first chill the cake. (This will ensure that the ganache will not lose its shine when the cake is stored in the refrigerator.)

    First, brush any loose crumbs from the cake. Using a cake spatula or knife, cover the sides and top of the cake with a thin layer of ganache. (This is called a crumb coat and seals in any cake crumbs so that your cake will have a smooth finish.) Refrigerate the cake for about 5 minutes or until the crumb coat has set. Then place the cake on a wire rack, and put the wire rack on top of a large baking sheet (to catch any excess

    Read More “[Recipe] My take on Nigella’s “girdle-buster pie”” »

    uncategorized

    [Recipe] Home Cured Corned Beef

    Posted on December 12, 2011December 12, 2011 By admin

    This is something I did earlier in the year, but forgot to blog about. Based on a recipe found here: http://simplyrecipes.com/recipes/home_cured_corned_beef/

    Home Cured Corned Beef

    The spice mix with the gallon of brine makes easily enough curing brine for a 5 pound brisket, cured in a somewhat large-ish container. If you were to use a 2-gallon freezer bag or marinating bag, you would likely need just half (or less) of the amount of brine and brine spices.

    Ingredients

    Pickling spices:

    * 1 Tbsp whole mustard seeds (brown or yellow)
    * 1 Tbsp coriander seeds
    * 1 Tbsp red pepper flakes
    * 1 Tbsp whole cloves
    * 1 Tbsp whole black peppercorns
    * 6 large bay leaves, crumbled
    * 2 teaspoons ground ginger
    * 1/2 stick cinnamon

    Brine:

    * 1 gallon water
    * 2 cups Kosher salt
    * 5 teaspoons pink curing salt*
    * 3 Tbsp pickling spices
    * 1/2 cup brown sugar

    *Pink curing salt, or sodium nitrite, goes by many names, such as Prague Powder #1 or DQ Curing Salt #1, and is available online and may be available at your local specialty market or butcher shop. If you don’t have it, you can still make corned beef, but it is necessary for that vibrant pink color we associate with corned beef. And it adds flavor too. Without it the corned beef will be a dull grey color. [Rc note: see, I couldn’t get this at all, but I used the curing salt mix from Weschenfelder and it worked out fine]

    Brisket:

    * 1 4-5 pound beef brisket
    * 1 Tbsp pickling spices

    Method

    1. You can either used store-bought pickling spices or you can make your own. To make your own, toast the mustard seeds, coriander seeds, red pepper flakes, cloves and peppercorns in a small frying pan on high heat until fragrant and you hear the mustard seeds start to pop. Remove from heat and place in a small bowl. Use a mortar and pestle to crush the spices a little (or the back of a spoon or the side of a knife on a flat surface). Add to a small bowl and stir in the crumbled bay leaves and ground ginger.
    2. Add about 3 Tbsp of the spice mix (reserve the rest for cooking the corned beef after it has cured), plus the half stick of cinnamon, to a gallon of water in a large pot, along with the Kosher salt, pink salt (if using), and brown sugar. Bring to a boil, then remove from heat and let cool to room temperature. Then refrigerate until well chilled.
    3. Place the brisket in a large, flat container or pan, and cover with the brine. The brine should cover the meat. The meat may float in which case you may want to weigh it down with a plate. Alternatively you can use a 2-gallon freezer bag (placed in a container so if it leaks it doesn’t leak all over your refrigerator), place the brisket in the freezer bag and about 2 quarts of brine, squeezing out the air from the bag before sealing. Place in the refrigerator and chill from 5-7 days. Every day flip the brisket over, so that all sides get brined equally.
    4. At the end of the cure, remove the brisket from the brine and rinse off the brine with cold water. Place the brisket in a large pot that just fits around the brisket and cover with at least one inch of water. If you want your brisket less salty, add another inch of water to the pot. Add a tablespoon of the pickling spices to the pot. Bring to a boil, reduce to a very low simmer (barely bubbling), and cook 3-4 hours, until the corned beef is fork tender. (At this point you can store in the fridge for up to a week.) Remove the meat to a cutting board. Slice thinly against the grain to serve.
    uncategorized

    [Recipe] Chewy chocolate chip cookies

    Posted on November 6, 2011 By admin

    Ingredients

    125g butter, softened
    100g light brown soft sugar
    125g caster sugar
    1 egg, lightly beaten
    1 tsp vanilla extract
    225g self-raising flour
    1/2 tsp salt
    200g chocolate chips

    1. Preheat the oven to 180°C, gas mark 4.

    2. Cream butter and sugars, once creamed, combine in the egg and vanilla.

    3. Sift in the flour and salt, then the chocolate chips.

    4. Roll into walnut-sized balls.

    5. Place on ungreased baking paper. If you want to have the real Millies experience then bake for just 7 minutes, till the cookies are just setting – the cookies will be really doughy and delicious. Otherwise cook for 10 minutes until just golden round the edges.

    6. Take out of the oven and leave to harden for a minute before transferring to a wire cooling rack. These are great warm, and they also store well, if they don’t all get eaten straight away!

    uncategorized

    [Recipe] Toffee popcorn bark

    Posted on October 24, 2011October 24, 2011 By admin

    Line a baking tray with parchment paper. Melt 200g milk chocolate and 200g white chocolate separately then allow to cool slightly.

    Pour most of the chocolate onto the tray, roughly swirling together. Sprinkle over 60g of toffee popcorn, then drizzle over the remaining chocolate. Chill until set, then break into big chunks before serving.

    In one word: EVIL!!!

    uncategorized

    [Recipes] Chili

    Posted on October 17, 2011October 17, 2011 By admin

    I made chili this weekend. It was nummilicious, but there is room for improvement. Though the original recipe calls for beef, I made it with turkey breast so that Katy’s mom could try some. I’ll try again with beef next time, and possibly add a bit more liquid and more heat. Even though the heat seemed quite fiery while it as cooking, once it was well reduced and had stood in the fridge overnight, it really mellowed out. I had also put some bacon off-cuts in the mix, but they were waaaay too salty for the end result.

    Ingredients

    2 tsp ancho chili powder
    1 tsp chipotle chile powder
    1 Tbsp ground cumin
    2 tsp ground oregano
    1 tsp thyme
    1/2 tsp ground coriander seeds
    3-4 Tbsp water

    6 strips bacon
    One 2 1/2 pound braising steak (aka chuck roast), cut into 1/2-inch cubes
    1 medium white onion, chopped
    1 large green pepper, chopped

    1 large tin plum tomatoes
    2 1/2 cups veggie stock
    1 tin dark beer
    1 Tbsp freshly squeezed lime juice
    1 tsp sugar

    Grated cheddar cheese and chopped red onion for garnish

    Method

    1 In a small bowl mix the chili powder, chipotle chili powder, ground cumin, oregano, thyme, and ground coriander seeds. Mix in water so that chili forms a light paste. Set aside.

    2 Cook the bacon in a large skillet on medium high heat until crisp. Use a slotted spoon to remove from pan and set aside on a paper towel. Pour bacon fat from the pan into a separate container, reserve. When the bacon cools, crumble it into smaller pieces and set aside.

    3 Increase heat to medium high, add back in 1 Tablespoon of bacon fat. Working in batches so that you don’t crowd the beef (crowding will steam cook the meat instead of browning it), brown the beef cubes on all sides, lightly salting as you cook the beef. Remove beef from pan, set aside.

    4 Add another Tablespoon of bacon fat to the pan. Add the chopped onions and sauté until soft, about 5 minutes. Add the garlic and jalapeño, cook until fragrant, 1 minute more. Add the chili paste and cook for 2-3 more minutes.

    5 Into a 6-quart thick-bottomed Dutch oven, put onion chili mixture, beef, bacon, tomatoes (break up the whole tomatoes with your fingers as you put them in the pot), water, lime juice and sugar. Heat the chili on medium high heat until it comes to a simmer. Then reduce the heat to low. Cover and cook for 1 1/2 hours. Then uncover and cook for another half hour, keeping the temperature at a place where you can maintain a simmer.

    6 Mix the cornstarch powder into a little water to dissolve the corn starch (otherwise you’ll have lumps to deal with) and add to the chili to thicken it. Add salt to taste. Adjust seasonings. Depending on the acidity of the tomatoes and lime juice you may need a little more sugar to bring the stew to balance. At this point you can also add a little more chili powder if you desire more heat.

    Sprinkle with grated cheddar cheese and chopped red onion. Serve with cornbread, tortilla chips, and or rice.

    EDIT: I forgot to mention that I got the chili powders from Cool Chili. They rock.

    uncategorized

    [Recipe] Pulled Pork!

    Posted on July 20, 2011 By admin

    I’ve been wanting to try this for ages, and I finally got up the courage to try to make pulled pork. I had the butcher keep me a bone-in shoulder (aka pork butt) last weekend. When I weighed it this morning, it was a touch over 10 pounds :)

    I trimmed the fat and skin off of it, coated it with lemon olive oil and then gave it a good coating of dust:

    Meathead’s Memphis Dust Rub Recipe
    Adapted from: http://www.amazingribs.com/recipes/rubs_pastes_marinades_and_brines/meatheads_magic_dust.html

    1/4 cup firmly packed dark brown sugar
    1/4 cup white sugar
    2 tbsp paprika
    1 tbsp kosher salt
    1 tsp ground black pepper
    1 tsp ground ginger powder
    1 tsp onion powder
    1 tsp dried rosemary leaves, ground to a powder

    I used the fast-cook method, if only because I can’t control the heat well enough on my smoker. Normally, the cooking time would be to allow 2 hours per pound at 225°F. Even though butts are very forgiving and temp control isn’t crucial, I also wasn’t keen on refueling my smoker for 20 hours.

    After 4 hours of smoking at about 225°F with lots of smoke, adding a handful of soaked wood chips every 30 minutes or so, put the meat on a roasting rack in a roasting pan and pour a cup of water or apple juice into the pan. Cover the meat with foil and fasten the foil tightly to the edges of the pan so the meat is in a nice enclosed environment. Roast in the oven at 350°F for another 2 to 3 hours or until the temp hits 190°F and it passes the fork test.

    When it hits about 180°F, collagens, which are part the connective tissues, begin to melt and turn to gelatin. The meat gets much more tender when this happens. And juicy. When it hits 190°F, it may be ready, and it may not be ready. But it’s time to check. If there is a bone, use a glove or paper towel to protect your fingers and wiggle the bone. If it turns easily and comes out of the meat, the collagens have melted and you are done. If there is no bone, use the “stick a fork in it method”. Insert a fork and try to rotate it 90 degrees. If it turns with only a little torque, you’re done. If it’s not done, close the lid and leave it for 30 minutes. If the internal temp hits 190°F but the meat is still not tender, reduce the heat in your cooker to about 190°F and hold it there for as much as another hour. It should then be done. If not, you’ve just got a tough butt. Wrap tough butts in aluminum foil and let them go for another hour, but don’t take them above 200°F or else the muscle fibers will start giving up moisture and toughen.

    Leave the butt to rest for 30-60 minutes, then start pulling! Put the meat into a large pan to catch drippings. Pull the clod apart with gloved hands or forks. Discard big chunks of fat. If you wish you can slice it or chop it, but you lose less moisture by pulling it apart by hand since the meat separates into bundles of muscle fibers, hence the name pulled pork. Try not to eat all the flavorful crusty bits when you are doing the pulling, and distribute them evenly throughout. Make sure you save any flavorful drippings and pour them over the meat.

    Adapted from: http://www.amazingribs.com/recipes/porknography/perfect_pulled_pork.html

    uncategorized

    [Recipe] Dutch apple cake

    Posted on July 2, 2011 By admin

    From the Rachel Allen cookbook. I was bored today and felt like cooking.

    Ingredients:

    Two eggs
    175g caster sugar
    Half tsp vanilla essence
    75g butter
    75ml milk
    125g plain flour
    Half tsp ground cinnamon
    2¼ tsp baking powder
    Two small or one medium cooking apple
    A separate 15g caster sugar

    Preheat the oven to 200ºC, Gas Mark 6. Grease, and line with parchment paper, an 8″x 8″ square tin.

    Whisk the eggs with the 175g caster sugar until the mixture is thick and mousse-like and the whisk leaves a figure ‘8’. (about 5 minutes)

    Melt the butter with the milk and pour onto the eggs, whisking all the time. Sieve in the flour and baking powder and fold carefully into the batter so that there are no lumps of flour. Pour the mixture into the prepared tin.

    Peel and core the apples and slice into thin slices. Arrange them over the batter. They’re going to sink, that’s normal. Sprinkle with the remaining 15g of sugar. Bake in the preheated oven for 10 minutes, then reduce the heat to 180ºC, Gas Mark 4, for a further 20 to 25 minutes, or until well risen and golden brown.

    Cool in the tin and serve warm. Delicious with cream, or, of course, custard.

    uncategorized

    [Recipe] Lemon scones

    Posted on February 26, 2011February 27, 2011 By admin

    image

    Zest and juice of one lemon
    450g self raising flour
    80g unsalted butter, cubes
    3 tbsp caster sugar
    300ml whole milk

    Preheat oven to 200c. Sift flour with a pinch of salt and Sdf the finely chopped lemon zest. Rub butter into the flour until it resembles fine breadcrumbs. Stir in the sugar and a few tbsp of lemon juice. Gradually mix in the milk until you have a rough dough (not all the milk might be necessary). Mix or knead as little as possible. Turn into a floured board and roll to a thickness of 2cm. Cut out rounds with a 6cm cutter. Put on a baking sheet and bake for 12-15 minutes. Cool on a rack and serve with cream and jam.

    uncategorized

    [Recipe] BBQ baby back ribs

    Posted on April 6, 2010April 23, 2010 By admin 2 Comments on [Recipe] BBQ baby back ribs

    I made BBQ ribs this weekend. This was the first time I’d been able to savour BBQ ribs in close to 10 years. It was a moment that was waaaay too long in the making, but damn! They was good!!

    It’s a bit of a convoluted process, but the end result is so worth it if you can’t just to go a grill house and order them from there, as is the case for me. All in all, they took about 4 hours to get done.

    This process was adapted from the Meathead’s guide to amazing ribs:

    1) Rinse. Rinse the ribs in cool water to remove any bone bits from the butchering. Pat dry with paper towels.

    2) Skin ‘n’ trim. If the butcher has not removed the membrane from the back side, do it yourself. Insert a butter knife under the membrane, then your fingers, work a section loose, grip it with a paper towel, and peel it off. Finally, trim the excess fat from both sides.

    3) Rub. Coat the meat with a thin layer of vegetable oil because most of the flavourings in the rub are oil soluble, not water soluble. The oil should help the flavour get into the surface and for a better crust. A lot of seasoned barbecue cooks use a base of mustard, but I think oil works better. Sprinkle enough rub to coat all surfaces but not so much that the meat doesn’t show through. That is about 2 tablespoons per side depending on the size of the slab. Many of the herbs and spices in the rub are oil soluble, so the vegetable oil will help them penetrate a little better. Spread the rub on the meat and rub it in. Wash your hands. Wrap the meat in half the foil and let it sit in the fridge for at least 4 hours on a platter or pan to catch leaks. In addition to flavouring the meat, the salt in the rub pulls the juices to the surface and that will help form a crust during the cooking.

    Meathead’s Memphis Dust Rub Recipe
    Adapted from: http://www.amazingribs.com/recipes/rubs_pastes_marinades_and_brines/meatheads_magic_dust.html

    1/4 cup firmly packed dark brown sugar
    1/4 cup white sugar
    2 tbsp paprika
    1 tbsp kosher salt
    1 tsp ground black pepper
    1 tsp ground ginger powder
    1 tsp onion powder
    1 tsp dried rosemary leaves, ground to a powder

    4) Setup your cooker for indirect cooking with 2 zones. That means that one side is hot and the other is not. For my gas BBQ, that means only using the left-hand burner. Put a disposable aluminum pan with water on top of the hot burner. Moisture and combustion gasses in a propane grill combine to create a seductive, baconlike flavor in the meat.

    5) Adjust the temp. Preheat your cooker to about 225F and try to keep it there throughout the cook. Take your time getting the temp right. Cooking at 225F will allow the meat to roast low and slow, liquefying the collagen in connective tissues and melting fats without getting the proteins knotted in a bunch. It’s a magic temp that creates silky texture, adds moisture, and keeps the meat tender. If you can’t hit 225F, get as close as you can. Don’t go under 200F and try not to go over 250F. On my BBQ, this is about 2/3 down on the dial. A tip to see if the temp is too high is to check the water in the water pan. If there are bubbles, you’re probably too high.

    6) Smoke. For charcoal or gas cookers, add 4 ounces of wood at this time. I put some apple wood chips that had been soaked for 30 minutes and then drained in a cast-iron smoke box that I put right on top of the flame. Resist the temptation to add more wood. Nothing will ruin a meal faster and waste money better than oversmoked meat. You can always add more the next time you cook, but you cannot take it away if you oversmoke.

    7) Relax. Put the slabs in the BBQ on the cooler side of the grill, meaty side up on a grill pan with a wire tray. Close the lid and go drink a beer and read a book.

    8) More smoke. When the smoke disappears after 20-30 minutes, add another 2 ounces of wood. After the first hour, stop adding wood. Adding wood at the beginning of the cook allows better penetration before the meat surface seals itself. If you have more than one slab on, halfway through the cook you will need to move the ribs closest to the fire away from the heat, and the slabs far from the flame in closer. Leave the meat side up. There is no need to flip the slabs. Otherwise, keep your lid on. Opening the lid just upsets the delicate balance of heat, moisture, and oxygen inside your cooker. It can also significantly lengthen the cooking time. No peeking. If you’re lookin’, you ain’t cookin’.

    Check the water level every 45 minutes or so and top off with boiling water from the kettle if required.

    9) The bounce test. After allow 5-6 hours for St. Louis Cut ribs or 3-4 hours for baby back ribs. The exact time will depend on how thick the slabs are and how steady you have kept the temp. If you use rib holders so they are crammed close to each other, add another hour. Check to see if they are ready. I like the bounce test. Pick up the slab with tongs and bounce them. If the surface cracks and it bends a lot, it is ready.

    10) Sauce. Now paint both sides with your favourite home made barbecue sauce. Move the slab directly over the hottest part of the grill in order to caramelise and crisp the sauce. On a gas grill, remove the water pan and crank up all the burners. Sizzle the sauce on one side and then the other. One coat of a thick sauce should be enough, but if you need two, go ahead, but no more! Don’t hide all the fabulous flavors under too much sauce. If you think you’ll want more sauce, put some in a bowl on the table. I left the ribs to grill in direct heat for about 20 minutes, flipping regularly so they didn’t burn.

    Home-made BBQ Sauce
    1 bottle of reggae reggae love apple tomato ketchup
    1/3 tin of Tate & Lyle black treacle (aka molasses)
    a splash of balsamic vinegar

    Mix everything and simmer until well blended. Adjust taste if too sharp or sweet.

    Additional reading:

    The Zen of Wood
    http://www.amazingribs.com/tips_and_technique/zen_of_wood.html

    uncategorized

    Posts pagination

    Previous 1 … 42 43 44 … 49 Next

    Power to the beaver!

    Show me the beaver!
    June 2026
    M T W T F S S
    1234567
    891011121314
    15161718192021
    22232425262728
    2930  
    « May    

    Quote of the day

    I must confess the the activities of the UK governments for the past couple of years have been watched with frank admiration and amazement by Lord Vetinari. Outright theft as a policy had never occured to him.
    --(Terry Pratchett, alt.fan.pratchett)

    Random Posts

    • Pornstars per million inhabitants
    • Did I mention there's a bird nest in our BBQ?
    • Backwards Man!
    • Italian beer, foxes and gibberish
    • I have a purring cat asnooze on my lap
    reading leopard

    Tags

    bobble the little blue owl boobies brought to you by the fda cats chonk christmas comics computers are evil covid-19 dealing with idiots dilbert dog ducks galleries geek god bless the land of the free holidays house I am Canadian land of cheese and chocolate linked news lolcat london news from the stupid not my dog nsfw pets pictures potd2014 qotd random shit re-member recipes relationship shrill slice of life stress Tao the british way The Peanut things i miss travel video wine work

    Archives

    Meta

    • Log in
    • Entries feed
    • Comments feed
    • WordPress.org

    Copyright © 2026 The beaver is a proud and noble animal.

    Powered by PressBook Premium theme

    Loading Comments...